Piano Fingering
Home » Piano Technique » Piano Fingering
In the coming beginner piano lesson I'll show you how to name the fingers and introduce you to the concept of placing you hands on the piano using different hand positions. This knowledge is going to help you learning to play the piano while understanding the terms in our beginning piano lessons.
Once we're done with that I'll show you a few piano fingering techniques that will help you to play piano smoothly. But let's take it one step at a time...

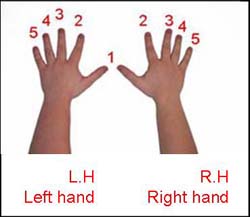
Fingers have numbers. It's easier to name them that way.
The thumb is the first finger of each hand.
Pay attention to the fact that our hands are symmetric.
The THUMB is the first finger of each hand.

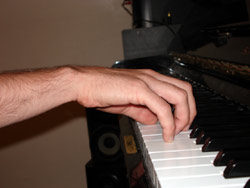
When we play our fingers should be curved.
Imagine you're holding a bubble. (I use the image of a bubble since you have to round you hand gently so it won't break).
The palm of your hand has to be rounded as well. Many people tend to make it flat. Imagine you're creating a little tent with your hand.
Now pay attention to your fingers. Do they all look the same?
Not really ha? To begin with, our fingers have different lengths. More than that, the thumb is quite weird since it is positioned on the side as opposed to the other fingers.
When we curve our fingers we help our fingers stand in one line more or less. By minimizing the gap between the differences of the lengths of the fingers we help ourselves create unity in the sound we're going to produce on the piano. It's easier to play when all fingers are positioned equally on the piano.
As for the thumb, this is a different story. We won't curve it but simply let it lay on its side because of its particular position.
Keep your fingers rounded when you press a piano key. Don't break them.
The reason we keep our fingers curved is that roundness is the key to creating a continuing movement on the piano easily.
Roundness will help produce volume without causing pain in our body as well.
When we play piano we only use the pillow of finger. We play a key with the tip of our pillow close to the nail. This is an excellent tip that will help you keep your fingers round without breaking them and will assist in creating a clear bright sound.
Hand Positions - The C Position

Different piano pieces are located on different areas on the piano. Therefore when we play the piano we use different hand positions.
A hand position is where you place the hand as you begin to play a piece.
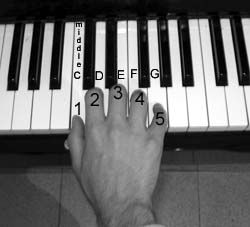
During our piano lessons we're going to place our hands on different positions on the piano. Until further notice we will use the C position. We'll place our right hand thumb on middle C, the second finger on D and so on respectively, until our fifth finger is placed on G. have a look at the picture.
In the first pieces we're going to play we'll be using only the right hand in the Middle C position. Later on we're going to add the left hand. When the time is right you'll see an image with the new hand position and the correct piano fingering that goes along with it.
Later on, as we turn to harder piano pieces we will see that we can switch between the different hand positions.
| Make sure you keep your hand on the same position and that you stick to the correct piano fingers mentioned above the notes. |
The thing is that not all our fingers are equally strong. The fourth and the fifth fingers are usually weaker and many people avoid using the thumb. Therefore we'll have to practice a few piano fingering exercises.
E.D. Exercise for Piano Fingerings
Huh? E.D? E.D. is the initials for Every Day. These sorts of exercises will help you improving your piano fingering technique if you'll play them every day for five minutes. What we're going to do is place our hand on the C position and ascend from C to G and descend slowly.
When doing so, we'll make sure that our hand is rounded and that we play only with the pillow of our fingers without breaking them. when moving from one finger to the other we'll try to do it without creating pauses between the notes.
 Many students told me that they would like to improve their fingering dexterity and their piano fingering technique.
Hear and Play made this handy Finger Exercises Course that will help you to improve with it.
It is based on playing some great technique exercises made by Hanon, (Who wrote the most effective book that deals with piano fingering technique)
and all it takes is 15 minutes a day.
Click here to buy the Finger Exercises Course Now!


