Piano Fingerings
Home » Piano Technique » Fingerings
Earlier in our piano lessons we've learned about the basic C position.
First, we placed only the right hand on the piano and then we added the left hand.
Mind the Gap - Streching Fingers
When we're playing in fixed hand positions we assume that a piece is made out of five notes in each hand. The each finger remains fixed on a specific key through the whole song.
It's a different story however if a melody is combined of more then these five notes.
Let's take Twinkle Twinkle little star for example.
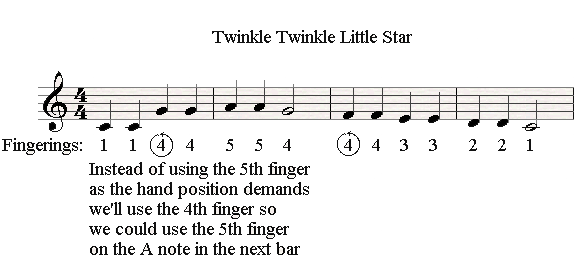
In this piece we have to reach the A note quite in the beginning. If we were to stick to playing G with the fifth finger we wouldn't be able to play the A note since we'd be out of fingers.
Therefore we actually have to plan our piano fingering a bit in advanced. By replacing the fifth finger with the fourth finger on
the G note we can over come this problem.
We call the this piano fingering stretch.
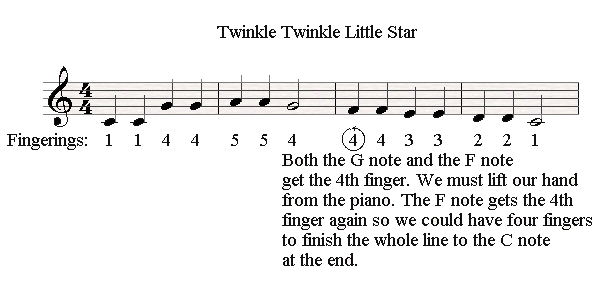
When the melody is going down from G to F we can simply continue to descend until we reach D with the first finger. What can we do then?
Two options are possible; again planning in advanced might help here.
After landing on the fourth finger when G is played in the long note we can lift our finger and replace the fourth finger on F again.
Then we'll have fourth finger to finish the descending line going to middle C.
By doing that we basically change the hand position at the end of a musical phrase.
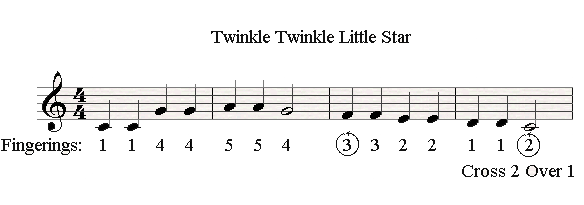
Another option is to reach D with the first finger and then to perform a cross over.
We'll speak about that in a moment but first here are a few exercises that will help you to practice different gaps.
As you proceed with your study you'll get there automatically; but remember that anticipation is essential in improving in this field. Try to read a few notes further when you play. Have a look at a piece before and explore its piano fingerings to save some troubles in advanced.
These next few exercises deal with strectching fingers. I believe you'll find them very usefull in bringing that technique all together in your system.
| The Exercise | Pdf File | Mp3 File |
| 1. Fingers Stretch | Download | |
| 2. Fingers Stretch | Download | |
| 3. Fingers Stretch | Download | |
| 4. Fingers Stretch | Download | |
| 5. Fingers Stretch | Download |
Arpeggios
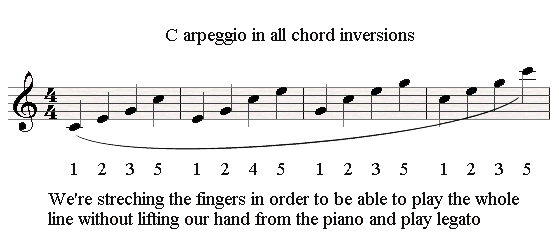
An arpeggio is a broken chord in which the individual notes are sounded one after the other instead of simultaneously.
When you play an arpeggio you basically have to play a few piano fingerings stretch at once. It takes an advanced planning in order to perform the optimal piano fingering.
If we take a C major chord in its root position but we'll add the root on top as well we'll have to perform some changes in our hand position.
So if usually the third finger played the E note in the C position now the second finger will play it to allow the G note to be played on the third note.
Why? Since we have to leave free fingers for the jump from G to the upper C played by the fifth finger.
Switching Hand Positions
From a certain level, we will play pieces that demand a change in our hand position. There are three ways to switch between hand positions.
The first one is by jumping to the next hand position.
The second way is by replacing the piano fingerings when a note repeats and the last one is by the cross over or cross under.
Jumps
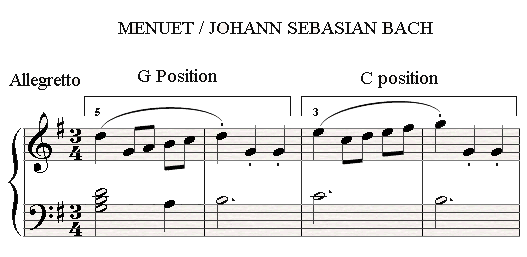
In this beautiful piece by Bach called Menuet we have to switch the hand position from the G position to C position in the third bar. The second bar ending in staccato allows us to lift our hand from the keyboard and replace it on the E note in the beginning of the next bar in a musical and elegant way.
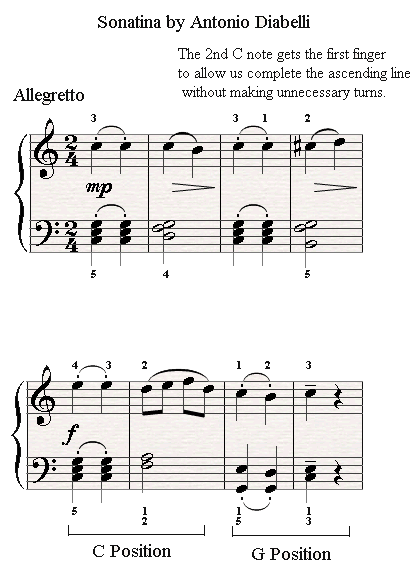
In this next Sonatina by Diabelli we have to switch hand positions in from bar six to bar seven through a jump as well. The jump is performed again by lifting the hand and falling to the next chord which gives the chord more emphasis through the weight being activated on the key.
Changing Piano Fingering on Repeating Notes
Check out the sonatina by Diablli again. Notice that in bar three the C note repeats. That's a great oppurtunity to replace the piano fingering from the 3rd finger to the 1st finger. That will allow us to have more finger (four instead of two) as we move in the ascending line to E.
Cross Over
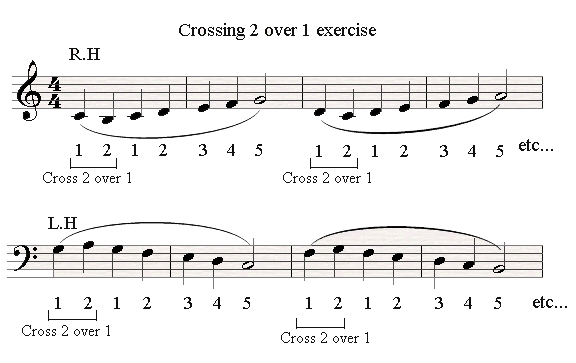
Crossing 2 over 1
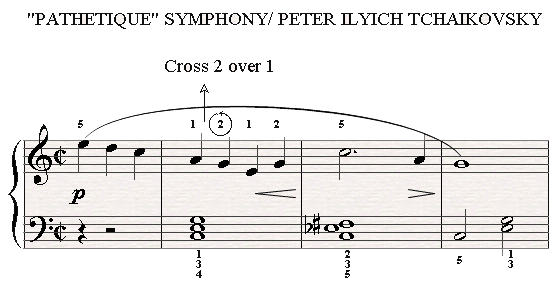
This is an important trick that makes it easy to play 6 notes with 5 fingers and to switch a hand position without lifting your hand.
When the second finger cross over the first finger the wrist should be kept high, and straight and the twisting of the hand should be avoided in the cross over.
Here's an example of a piece with a cross over in the Pathetique Symphony by Tchaikovsky.
| The Exercise | Pdf File | Mp3 File |
| 1. Crossing 2 over 1 exercise 1 | Download | |
| 2. Crossing 2 over 1 exercise 2 | Download | |
| 3. Crossing 2 over 1 exercise 3 | Download | |
| 4. Crossing 2 over 1 exercise 4 | Download | |
| 5. Crossing 2 over 1 exercise - London Bridge | Download | |
| 6. Crossing 2 over 1 exercise - Boogie | Download |
Playing scales and scale like phrases - cross 3 over 1
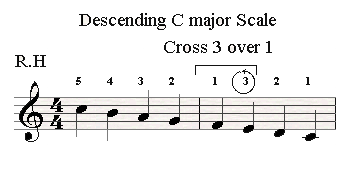
Let's take the C major scale and play it in an descending manner.
We start with the fifth finger on the upper C, and then we descend until we reach the F note with the first finger, then what?
In order to move to the E note we can simply cross over the third finger above the thumb while keeping the wrist high and straight.
What we actually did was moving from the F position to a C position.
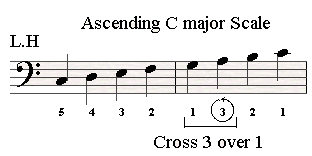
We can do the same by playing an ascending scale in the left hand.
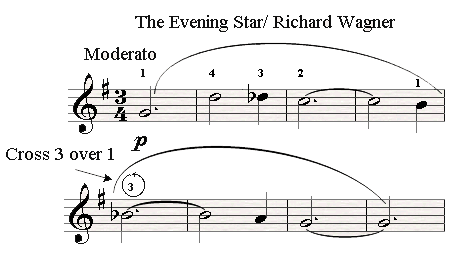 Here's an example of a piece perform with the cross 3 over 1.
Passing 1 under 2
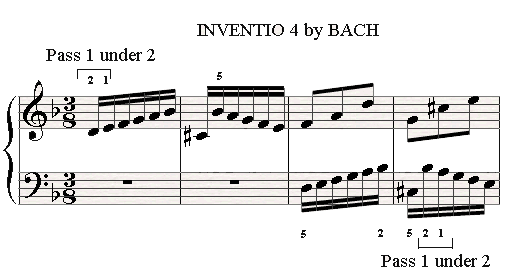
In this next invention by Bach we had to find an original way to overcome the problem of playing a six notes pattern with only five fingers.
There we start with the second finger and on the next note we pass the first under it which gives us an extra finger that will allow us to complete this musical phrase.
That's a common piano fingering. Here again, planning in advanced is the key to success.
In bar four a passing of the thumb under the second finger is performed in the imitation in the left hand.
Passing 1 under 3
By passing 1 under 3, we can play 8 notes with 5 fingers.
This makes it possible to play a complete scale with hand, ascending and descending.
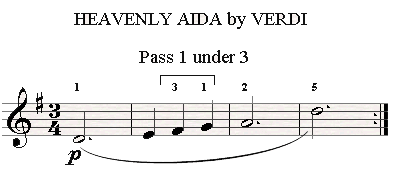
Here's an example of how we could use the passing 1 under 3 in heavenly Aide by Guiseppe Verdi. In this piece we basically switch the hand position for D position to G position.
 Many students told me that they would like to improve their fingering dexterity and their piano fingering technique.
Hear and Play made this handy Finger Exercises Course that will help you to improve with it.
It is based on playing some great technique exercises made by Hanon, (Who wrote the most effective book that deals with piano fingering technique)
and all it takes is 15 minutes a day.
Click here to buy the Finger Exercises Course Now!


